1
2
3
4
5
6
7
8
9
10
11
12
13
14
15
16
17
18
19
20
21
22
23
24
25
26
27
28
29
30
31
32
33
34
35
36
37
38
39
40
41
42
43
44
45
46
47
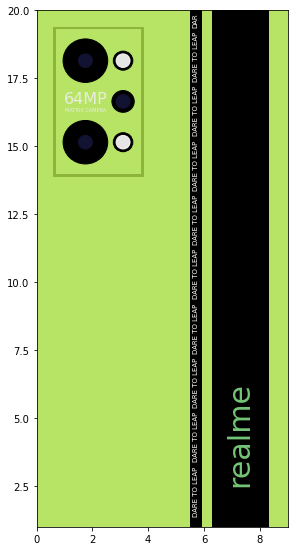
48
| fig = plt.figure(figsize=(4.5, 9.5))
ax = fig.add_subplot(1, 1, 1)
ax.set_xlim(0,9)
ax.set_ylim(1,20)
rect = plt.Rectangle((0, 1), 9, 20, color='#b7e464', alpha=1)
ax.add_patch(rect)
rect = plt.Rectangle((0.6, 13.9), 3.2, 5.5, color='#8db53c', alpha=1)
ax.add_patch(rect)
rect = plt.Rectangle((0.7, 14), 3, 5.3, color='#b7e464', alpha=1)
ax.add_patch(rect)
rect = plt.Rectangle((6.3, 0), 2, 20, color='k', alpha=1)
ax.add_patch(rect)
rect = plt.Rectangle((5.5, 0), 0.4, 20, color='k', alpha=1)
ax.add_patch(rect)
circ = plt.Circle((1.75, 15.15), 0.8, color='k', alpha=1)
ax.add_patch(circ)
circ = plt.Circle((1.75, 15.15), 0.25, color='#121233', alpha=1)
ax.add_patch(circ)
circ = plt.Circle((1.75, 18.15), 0.8, color='k', alpha=1)
ax.add_patch(circ)
circ = plt.Circle((1.75, 18.15), 0.25, color='#121233', alpha=1)
ax.add_patch(circ)
circ = plt.Circle((3.1, 16.65), 0.4, color='k', alpha=1)
ax.add_patch(circ)
circ = plt.Circle((3.1, 16.65), 0.25, color='#121233', alpha=1)
ax.add_patch(circ)
circ = plt.Circle((3.1, 15.15), 0.35, color='k', alpha=1)
ax.add_patch(circ)
circ = plt.Circle((3.1, 18.15), 0.35, color='k', alpha=1)
ax.add_patch(circ)
circ = plt.Circle((3.1, 15.15), 0.25, color='w', alpha=0.9)
ax.add_patch(circ)
circ = plt.Circle((3.1, 18.15), 0.25, color='w', alpha=0.9)
ax.add_patch(circ)
ax.text(7.3, 2.5, 'realme', ha = 'center', va = 'bottom', rotation=90,
fontdict = dict(fontsize=30, color='#74c476'))
for i in range(0, 9):
ax.text(5.7, 1.4+i*2, 'DARE TO LEAP', ha = 'center', va = 'bottom', rotation=90,
fontdict = dict(fontsize=7, color='w'))
ax.text(5.7, 1.4+(i+1)*2, 'DAR', ha = 'center', va = 'bottom', rotation=90,
fontdict = dict(fontsize=7, color='w'))
ax.text(1.75, 16.75, '64MP', ha = 'center', va = 'center', alpha=0.9,
fontdict = dict(fontsize=16, color='#EEEEEE', weight='light'))
ax.text(1.75, 16.35, 'MATRIX CAMERA', ha = 'center', va = 'center', alpha=0.9,
fontdict = dict(fontsize=5, color='#EEEEEE', weight='light'))
plt.savefig('realmeneo2.png', dpi=1080, bbox_inches='tight')
|